
Installing a wood floor using the glue-down method is a popular and reliable choice for homeowners and contractors seeking a durable and stable flooring solution. This technique involves adhering engineered or solid hardwood planks directly to the subfloor using a strong adhesive, ensuring a secure bond that minimizes movement and noise. Ideal for concrete subfloors and multi-level buildings, the glue-down method provides long-lasting results with a sleek, finished appearance. In this article, we will explore the key steps, tools, and tips needed for a successful glue-down wood floor installation.
cork flooring dubai – bamboo flooring dubai – vinyl flooring – vinyl flooring roll
What Is Glue Down Wood Flooring?
Glue down wood flooring is a method of installing hardwood or engineered wood floors by adhering the planks directly to the subfloor using a strong adhesive. This technique provides a stable and secure bond, making it ideal for areas where a solid, long-lasting installation is needed. Unlike floating floors that rest on a foam underlayment, glue down floors become permanently attached to the base, reducing movement, creaking, and shifting over time.
This installation method is commonly used with engineered wood flooring, especially over concrete or plywood subfloors. The adhesive used is typically a high-quality flooring glue designed to create a tight seal, helping to prevent moisture from penetrating the floor. Because the flooring is fixed in place, glue down installations offer excellent acoustic properties, making them a preferred choice in multi-story buildings where noise reduction is important.
Before starting the installation, the subfloor must be thoroughly cleaned, dry, and level to ensure a smooth finish. Once the glue is applied in sections, the planks are carefully laid and pressed into place. While the glue down method may take more time and skill than other options, it offers a professional appearance and lasting durability. It is a favored technique for those seeking a strong, stable, and elegant wood floor that stands the test of time.
Benefits of Glue Down Installation
- Strong and Secure Fit: Planks are firmly attached to the subfloor, minimizing movement and shifting.
- Noise Reduction: Offers excellent sound insulation, ideal for apartments or multi-level buildings.
- Durability: Creates a long-lasting bond, reducing the chances of gaps or warping over time.
- Low Floor Profile: No need for an underlayment, making it suitable where floor height matters.
- Improved Stability: Especially beneficial for engineered wood, maintaining shape in humidity changes.
- Professional Look: Provides a seamless, clean appearance with fewer raised edges.
- Compatible with Concrete Subfloors: Ideal for basements or buildings without wood subfloors.
- Better Heat Transfer: Efficient when used with underfloor heating systems.
- No Hollow Sound: Feels solid underfoot compared to floating floors.
- Reduces Expansion and Contraction: Helps control wood movement due to seasonal changes.
When to Choose the Glue Down Method
The glue down method is an excellent flooring installation choice in several specific situations, offering both performance and long-term reliability. It is particularly ideal when installing engineered wood flooring over a concrete subfloor, as it provides a solid and lasting bond that prevents shifting or lifting. If you are working in a commercial space, apartment, or multi-story building where noise reduction is important, the glue down method offers superior sound insulation compared to floating floors.
This method is also suitable for areas with moderate to high foot traffic, as the adhesive bond helps maintain floor stability under pressure. Additionally, when underfloor heating systems are used, glue down installation allows better heat transfer due to the direct contact between the wood and subfloor, improving energy efficiency.
Choosing the glue down method is wise when you want a permanent, professional finish. It is also preferred in spaces where maintaining a low floor height is essential, as it eliminates the need for an underlayment. However, it requires a clean, dry, and level subfloor and should be installed by someone with experience, as the adhesive sets quickly. For homeowners or businesses looking for a durable, quiet, and visually clean result, glue down flooring is a reliable and effective option.
Step-by-Step Installation Process
- Acclimate the Wood: Let the wood planks adjust to room temperature and humidity for 48–72 hours.
- Prepare the Subfloor: Clean, level, and dry the surface; remove any debris or moisture.
- Plan the Layout: Measure the room and mark guidelines using a chalk line to ensure straight rows.
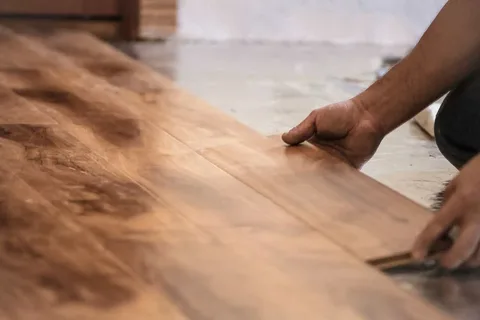
- Apply the Adhesive: Spread flooring adhesive with a trowel over a small section of the subfloor.
- Lay the Planks: Press each plank into the adhesive, starting from one corner and working outwards.
- Use Spacers: Leave expansion gaps (typically 1/4 inch) between the floor and walls.
- Stagger the Joints: Offset the end joints of each row to create a natural wood pattern.
- Roll the Floor: Use a floor roller to press the planks firmly into the adhesive and remove air pockets.
- Clean Excess Adhesive: Wipe off glue from the surface immediately with a damp cloth.
- Allow to Cure: Let the adhesive dry for at least 24 hours before walking on the floor or placing furniture.
Preparing the Subfloor
Proper preparation of the subfloor is a critical step in ensuring a successful glue down wood floor installation. A well-prepared subfloor provides a smooth, level, and clean surface that allows the adhesive to bond effectively and the flooring to remain stable over time. The first step is to remove any existing flooring, such as carpet, vinyl, or old hardwood, followed by a thorough cleaning to eliminate dust, dirt, and debris. Any adhesive residue or paint should be scraped off to create a clean base.
Next, inspect the subfloor for flatness. Uneven areas should be leveled using a self-leveling compound or ground down if necessary. A flat surface is essential to prevent gaps, creaks, or lifting of the wood planks. Moisture testing is also vital, especially when working with concrete subfloors. Excess moisture can damage wood flooring and weaken the adhesive bond, so it may be necessary to apply a moisture barrier or use a moisture-resistant adhesive.
In the case of concrete subfloors, ensure they are fully cured, clean, and free from cracks. For wooden subfloors, check for loose nails or damaged boards and make necessary repairs. Taking the time to properly prepare the subfloor reduces installation issues and helps achieve a smooth, long-lasting finish. It is a foundational step that should never be overlooked.
Caring for Your Glue Down Wood Floors
Maintaining your glue down wood floors properly is essential to preserve their beauty, durability, and longevity. Regular care helps prevent scratches, water damage, and fading, ensuring your flooring continues to look its best for years. Start with daily or weekly sweeping using a soft-bristle broom or a vacuum designed for hardwood to remove dust, dirt, and debris that can cause surface scratches. Avoid using wet mops or excessive water, as moisture can weaken the adhesive and damage the wood.
Instead, clean your floors with a damp microfiber mop and a wood floor cleaner that is pH-neutral and free of harsh chemicals. Always dry the surface thoroughly after cleaning. Place mats at entryways to reduce the amount of dirt and grit brought indoors, and use felt pads under furniture legs to avoid dents and scratches.
In areas exposed to sunlight, consider using curtains or blinds to protect your floor from discoloration caused by UV rays. Also, try to maintain consistent indoor humidity levels (ideally between 35%–55%) to reduce the chances of the wood expanding or contracting. If any planks become loose or damaged, have them repaired promptly to prevent further issues. With regular care and attention, glue down wood floors can maintain their strength and natural elegance for decades.
Tips for a Professional Finish
- Choose High-Quality Materials: Use premium wood planks and adhesive for better durability and aesthetics.
- Let Wood Acclimate: Allow flooring to adjust to the room’s temperature and humidity for 2–3 days.
- Check Moisture Levels: Always test the subfloor for moisture and apply a moisture barrier if needed.
- Use the Right Trowel: Match the trowel size to the adhesive manufacturer’s guidelines for proper coverage.
- Mark Layout Lines: Use a chalk line to guide the first row and maintain straight, even alignment.
- Work in Small Sections: Apply adhesive in manageable areas to prevent it from drying out too quickly.
- Stagger Joints Properly: Offset end joints in each row for a more natural and attractive appearance.
- Clean Excess Adhesive Immediately: Wipe away glue from the floor surface before it dries to avoid damage.
- Use a Flooring Roller: Roll the floor after installation to ensure full contact with the adhesive.
- Allow Adequate Curing Time: Wait at least 24 hours before walking on or placing furniture on the floor.
Conclusion
Glue down wood floor installation is a reliable and long-lasting method that offers both stability and a professional appearance. Whether used in residential or commercial spaces, this technique provides excellent sound insulation, strong adhesion, and a smooth finish that enhances the overall look and feel of any interior. While it requires careful subfloor preparation and skilled handling during installation, the results are well worth the effort. By following best practices and using quality materials, homeowners and professionals alike can achieve a durable and elegant flooring solution that stands the test of time.