
Vinyl flooring has become one of the most popular choices for both residential and commercial spaces due to its durability, affordability, and aesthetic versatility. Installing vinyl flooring correctly is essential to ensure a long-lasting and attractive finish. There are several installation methods available, each suited to different types of vinyl flooring and subfloor conditions. Understanding these methods helps homeowners, contractors, and DIY enthusiasts choose the best approach for their specific project, resulting in a smooth, professional-looking floor that stands the test of time.
wpc flooring – terrazzo dubai – office carpet flooring
Preparing the Subfloor for Vinyl Installation
Preparing the subfloor is one of the most crucial steps in ensuring a successful vinyl flooring installation. The subfloor acts as the foundation, so it must be clean, smooth, dry, and structurally sound before laying any vinyl material. Any imperfections, such as bumps, cracks, or debris, can lead to an uneven surface that may cause the vinyl to wrinkle, bubble, or wear prematurely. The first step is to thoroughly clean the subfloor by removing dust, dirt, grease, and any old adhesive residues.
Next, check for any moisture issues, especially if the subfloor is concrete, as excess moisture can damage vinyl flooring over time. Using a moisture meter helps determine if the subfloor is dry enough for installation. If necessary, apply a moisture barrier or sealant. After addressing moisture, inspect the subfloor for levelness.
Use a leveling compound to fill in any low spots and sand down high spots to create a flat surface. It’s also important to repair any cracks or holes to prevent future problems. For wooden subfloors, ensure all nails or screws are secure and the surface is rigid to avoid movement beneath the vinyl. Proper subfloor preparation not only improves the appearance of the finished floor but also extends its lifespan by preventing damage caused by an unstable or uneven base. Taking time at this stage guarantees a smooth, professional installation and long-lasting performance of vinyl flooring.
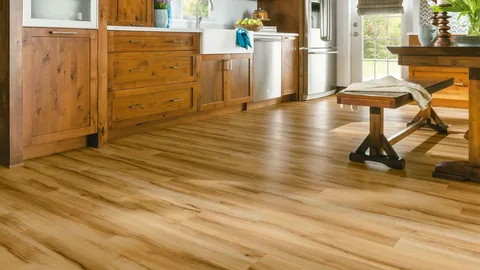
Types of Vinyl Flooring
- Sheet Vinyl: Comes in large, continuous rolls; ideal for moisture resistance and seamless appearance.
- Vinyl Tiles (VCT & LVT): Tiles can be glued down or clicked together; LVT (Luxury Vinyl Tile) mimics natural materials like wood or stone.
- Luxury Vinyl Planks (LVP): Designed to look like hardwood planks; popular for its durability and realistic texture.
- Glue-Down Vinyl: Requires adhesive; offers strong bond and stability.
- Peel-and-Stick Vinyl: Easy DIY installation; adhesive backing allows quick placement.
- Click-Lock Vinyl: Floating floor system; planks or tiles snap together without glue.
- Rigid Core Vinyl: Enhanced durability with a solid core; good for high-traffic areas.
Peel-and-Stick Vinyl Flooring Installation
Peel-and-stick vinyl flooring is a popular choice for DIY enthusiasts due to its simplicity and convenience. This type of flooring comes with a self-adhesive backing, allowing users to install it without the need for additional glue or special tools. The installation process begins with thorough preparation of the subfloor, which must be clean, dry, and free of any dust or debris to ensure proper adhesion.
After the surface is prepared, each vinyl tile or plank is carefully peeled from its backing and pressed firmly onto the subfloor. It is important to align each piece precisely to maintain straight lines and consistent spacing, which contributes to a professional-looking finish. Peel-and-stick vinyl is especially suitable for smaller rooms or renovation projects where speed and ease are priorities.
However, the adhesive may not be as strong as glue-down options, so it’s best used on smooth, stable subfloors like concrete or plywood. Additionally, environmental factors such as humidity and temperature can affect the adhesive’s performance. While peel-and-stick vinyl flooring offers a quick and budget-friendly solution, it may not be the best choice for high-traffic or moisture-prone areas, as the adhesive can wear down over time. Overall, peel-and-stick vinyl flooring provides an accessible and stylish option for those seeking a straightforward installation process with minimal tools and effort.
Glue-Down Vinyl Flooring Installation
- Requires spreading a strong adhesive evenly on the subfloor before placing the vinyl.
- Provides a very secure and durable bond, ideal for high-traffic areas.
- Suitable for both sheet vinyl and vinyl tiles/planks.
- Subfloor must be smooth, clean, dry, and level to prevent imperfections showing through.
- Installation usually takes longer due to adhesive drying time.
- Requires careful positioning as adhesive is sticky and difficult to reposition once pressed down.
- Professional installation is often recommended for best results.
- Offers better stability and reduces floor movement compared to floating floors.
- Can be installed over concrete, plywood, or other suitable subfloors.
- After installation, the floor may require a curing period before heavy use.
Click-Lock (Floating) Vinyl Flooring Installation
- Consists of vinyl planks or tiles with interlocking edges that snap together.
- No glue or nails required, making installation cleaner and faster.
- Installed as a floating floor, meaning it rests above the subfloor without being attached.
- Suitable for DIY projects and can be installed over many types of existing floors.
- Requires a smooth, clean, and level subfloor for best results.
- Allows for easy removal or replacement of damaged planks.
- Expansion gaps must be left around the perimeter to allow for natural floor movement.
- Offers good stability and durability for residential use.
- Often comes with a click-lock mechanism that ensures tight seams and prevents shifting.
- Can be installed over underlayment to improve comfort and sound absorption.
Tools and Materials Needed for Installation
- Utility knife or vinyl cutter for precise trimming
- Tape measure to ensure accurate measurements
- Straight edge or T-square for cutting straight lines
- Roller or hand roller to press vinyl firmly for good adhesion
- Notched trowel for spreading adhesive (for glue-down vinyl)
- Pry bar or scraper to remove old flooring or debris
- Broom and vacuum for cleaning the subfloor
- Level or leveling compound to ensure a flat surface
- Knee pads for comfort during installation
- Spacers to maintain expansion gaps (for floating floors)
- Adhesive or glue (if required by the vinyl type)
- Seam roller to smooth and seal vinyl seams
- Chalk line for marking straight installation lines
Common Installation Challenges and How to Avoid Them
Installing vinyl flooring can be straightforward, but several common challenges may arise that can affect the quality and longevity of the floor if not properly addressed. One of the most frequent issues is an improperly prepared subfloor. Uneven surfaces, dirt, or moisture can cause vinyl to bubble, lift, or wear prematurely. To avoid this, always ensure the subfloor is clean, dry, smooth, and level before installation.
Another challenge is inaccurate measurements and cutting errors, which can lead to gaps or awkward seams. Using precise measuring tools and cutting carefully with a sharp utility knife helps maintain a professional finish. Adhesion problems are also common, especially with glue-down or peel-and-stick vinyl. Applying adhesive evenly and allowing proper curing time is essential to prevent tiles from lifting or shifting. For click-lock floating floors, failing to leave adequate expansion gaps around the edges can cause buckling or warping due to temperature and humidity changes.
Always follow manufacturer guidelines for spacing. Additionally, working in extreme temperatures can affect adhesive performance and vinyl flexibility, so it’s best to install in moderate room conditions. Taking time to understand the specific installation method for your vinyl type, using the right tools, and following manufacturer instructions closely will minimize these challenges. By proactively addressing these common problems, you can achieve a smooth, durable, and visually appealing vinyl floor that lasts for years.
Maintenance Tips After Installation
- Regularly sweep or vacuum to remove dirt and debris that can scratch the surface.
- Clean spills immediately to prevent staining or damage.
- Use a damp mop with a mild, non-abrasive cleaner designed for vinyl floors.
- Avoid using harsh chemicals, abrasive scrubbers, or wax-based products.
- Place protective pads under furniture legs to prevent dents and scratches.
- Use rugs or mats in high-traffic areas to reduce wear.
- Avoid dragging heavy furniture or sharp objects across the floor.
- Maintain a consistent indoor humidity and temperature to prevent expansion or contraction.
- Periodically check and replace worn or damaged vinyl tiles or planks if possible.
- Follow manufacturer’s guidelines for deep cleaning or maintenance products.
conclusion
In conclusion, choosing the right installation method for vinyl flooring is essential to achieving a durable and attractive finish. Whether opting for peel-and-stick for a quick DIY project, glue-down for a strong and permanent bond, or click-lock floating floors for easy installation and flexibility, understanding the benefits and requirements of each method ensures the best results. Proper preparation of the subfloor, using the right tools, and following manufacturer guidelines are key to avoiding common pitfalls and prolonging the life of your vinyl floor. With careful planning and execution, vinyl flooring can provide a stylish, resilient, and cost-effective solution for any space.